I have received some lovely awards over the last few weeks. I am too ashamed to post them. It is not that I do not love receiving awards, it's the follow up that stresses me out. As you know, I have written before regarding rewards and tags. I really suck at it ( pardon the expression) LOL. I just can't pick the peeps I need to award. I'd love to award everyone I have met - and I hate imposing the choosing on anyone else. Honest, I was going to try it this time... sigh.
Thanks to all who have sent me awards but please next time, send me HUGS, k? I am sending all my awarders hugs ... I like hugging. grin.
I hope I didn't offend anybody... slunking off into the sunset. ....
:)

Tuesday, July 29, 2008


TUTORIAL: Colouring a Medallion with Gradients in Paint Shop Pro
I finally got the Gradient Flood-Fill Colouring in PSP Tutorial done. I hope it is understandable LOL! You can download it HERE . The tutorial is a PDF so you will need Adobe Reader or equivalent to read it. Sorry, it is on 4shared, I looked at my bandwidth allotment for my regular free file hosting and it was getting up there and may blow over if I use it, that means people are DOWNLOADING... happy dance! If you have any problems with 4shared, you can email me and request the file and I will email it to you. You will need a squarish medallion or flower image to complete this tutorial.
Purchaser's of the Stained Glass Floral Doodledallion outline sheet: please request the single doodledallion image via my email , have your purchasing email handy and/or transaction ID. I will gladly send you the file if you want to try out this tutorial. In the future, if I put up any more medallions, I will be adding a single image as well as the decoupage outline sheet automatically.
Purchaser's of the Stained Glass Floral Doodledallion outline sheet: please request the single doodledallion image via my email , have your purchasing email handy and/or transaction ID. I will gladly send you the file if you want to try out this tutorial. In the future, if I put up any more medallions, I will be adding a single image as well as the decoupage outline sheet automatically.
Monday, July 21, 2008
Downloading, tutorial soon & Digi-Freebie

Happy Monday! Sorry no monster today and when I get a round tuit, I will tally up some more cards, verses and add some photos :)
But today was a tech support day!!!! LOL E-junkie DID have a hosting server issue yesterday so it was wonky for a bit but all is good now. PayPal... still wonky but won't bother you.... just ME. LOL I have email records of everything thank goodness. If you had issues with your download yesterday, please try again. If you have run out of tries, please email me and I'll fix you up.
I was asked how to colour the Doodledallion in PSP. So alas, a long overdue tutorial is in the works. I'll try to have it up this week. But here is a preview of what you can do by flood-filling with gradients in Paint Shop Pro. I expect you can do the same thing with other graphics editing software. Please feel free to use on your cards. I think you can get 4 to a sheet for printing.
Until we meet again..... :)
Sunday, July 20, 2008
Paypal and download problems
PayPal has been acting wonky lately ( past few weeks). 50% of the time I can't log in and if I do, I can't access my account history or transaction details. This is not good for running a business. Also, I tried to do a download link test on a file I have for sale and I kept getting a "service unavailable" through my 5 download attempts. grr... It did eventually work. It might have been a temporary glitch. ... END of rant.
If you have any problems with the shopping cart or with your downloads please let me know, I will try to remedy ASAP.
Have a good day,
Fred, who's on her last frayed nerve with PayPal
If you have any problems with the shopping cart or with your downloads please let me know, I will try to remedy ASAP.
Have a good day,
Fred, who's on her last frayed nerve with PayPal
Friday, July 18, 2008
Digi-Freebie: Pink & Mellow
Happy Friday! I have been flabbergasted at the goings on at Fred, She Said Designs. Thank you so much for your support. I am just so happy, I made a freebie for you :) To save space, the images are 100 ppi. Just click on each image to get the full size and save.
I threw the paper together as an afterthought, the background for it is a canned doodle pattern in PSP and a bitty doodled flower custom brush I drew many moons ago. This freebie just needed a backing paper to go with it :) Next week, I may continue this mellow flavour and make a set with a few of my favourite mellow colours and some more "thought out" papers LOL, it will also be a larger resolution than these.


If you have downloaded these, I would love it if you would leave a comment that you have "nabbed"! :)
Have a great day.
I threw the paper together as an afterthought, the background for it is a canned doodle pattern in PSP and a bitty doodled flower custom brush I drew many moons ago. This freebie just needed a backing paper to go with it :) Next week, I may continue this mellow flavour and make a set with a few of my favourite mellow colours and some more "thought out" papers LOL, it will also be a larger resolution than these.


If you have downloaded these, I would love it if you would leave a comment that you have "nabbed"! :)
Have a great day.
Tuesday, July 15, 2008
By Request : Plain Papers Digi-Freebie
A lovely person ( who enjoys Lace [lac-ay] cutting craft ... you know who you are :) ) emailed me and requested some plain papers to go with the Blossom Kits. She wanted to print them on the back-side of the patterned papers. You know, two-sided paper - so when you do your lace cutting, the color coordinates.
EDIT ( July 15 ) Janet Kay( bspruce on CoC ) made an exquisite example of Lace cutting. I am so glad you liked your plain papers, girlfriend (wink).

Anyhoo, maybe you all would like them. The colours coordinate with the Blue, Pink and Purple Fred's Flower v3 Blossom Kits for sale at the store. They are lightly textured and full sized 8.5x11" sheets 200 ppi resolution. Here are the swatches:

EDIT: Here is the new download link for these papers :) Have a lovely day, now get back to your crafting or blurfing!
EDIT ( July 15 ) Janet Kay( bspruce on CoC ) made an exquisite example of Lace cutting. I am so glad you liked your plain papers, girlfriend (wink).

Anyhoo, maybe you all would like them. The colours coordinate with the Blue, Pink and Purple Fred's Flower v3 Blossom Kits for sale at the store. They are lightly textured and full sized 8.5x11" sheets 200 ppi resolution. Here are the swatches:

EDIT: Here is the new download link for these papers :) Have a lovely day, now get back to your crafting or blurfing!
Monday, July 14, 2008
Monday Monster 2 ( digi-freebie )

Please click image to enlarge and then save.

EDIT - the artist thought blacking out the mouth cavity was more aesthetically appealing ;)
( I don't have a card yet but will edit this post when I do ;) )
OK, peeps. This week's monster is a little gross-ning! ( That was the way us Canadian kids said gross back when I was Nolan's age LOL )
This is not the little friend monster I was refering to in a previous post, note to self - DO NOT ask a grumpy 10 soon to be 11 year old to redraw something he has ALREADY DRAWN bigger cuz it wouldn't scan well LOL!
This guy is "Goopy". He is so disgusting looking, he's cute! All I can think of is:
" When I am near you, I turn to a puddle of goo"
Same applies for this monster, email me or blog a card and Nolan gets 20 cents :) I will add them to the parade of cards at the top of my blog.
Or, if you can think of some witty verses to go with this one, please leave a comment. I will count it as a card ;) ( double cash points if witty saying is on a card LOL)
Thank you so much for all your comments, cards, and support! I am a puddle just like this guy (sniff)
Also, I hope to have something besides monsters to share, I promise. I've been drawing new stuff and colouring with my new Koh-I-Noor woodless pencils ; thanks Gina K!!! They rock. There will be new flowers, some revamped versions for stampers, a mermaid & friends, and some doodledallions I have been meaning to get ready since I started this wild ride!
Have a great day all!
Monday, June 30, 2008
Monday Monster - digi-freebie & challenge

Isn't he cute?!!! This little monster was drawn by Fred Jr., yes, my 10 year old son Nolan has inherited the drawing bug as well, so much so, I have run out of places to keep all his cartoons/drawings/comic books LOL! To avoid boredom ( day 2 into the Summer Holidays) I asked Nolan to draw me stuff - " Like what, Mom?" - " I don't know, maybe a cute creature or monster holding a flower - so I can put my flowers on it". Ten minutes later, he came back with this cute little monster AND completely inked - with a stem and leaf so you can add your own flower. The kid amazes me.
Like all kids, especially ones with expensive tastes ( cough Wii, cough Nintendo DS) he was thinking dollar signs LOL! So I told him, "how about if the Peeps out in blog land email me or link up cards they have made using this monster, "I" will give you 20 cents for each card made?"
Sound like a challenge? LOL! Maybe we can entice him to make more ;)
Card Details:
-DollarStore dotty paper
-Monster coloured with prismacolor pencils and OMS
-I added stickles to the purple spots ( please NOTE: I was told the spot between the eyes is NOT his nose -- but please use your artistic license ;) LOL
-I used pop dots on the flower ( 2 small flowers from Fred's Flowers v2 Pointy Petals Pack)
-white glaze pen on teeth and eye highlights
- scalloped circle is hand punched with my corner rounder - don't look too close! LOL
Here is the monster:

Please click on him to enlarge, then right-click on him and save the image to your harddrive.
If anything, please comment on this post and tell Nolan what you think of his monster. He would love to read your comments :))
Thursday, June 26, 2008
Blog Candy Winner!
Thank you for all the great comments :) We had 53 comments altogether; I put numbers on bits of paper and Emma drew out of a bowl. I'd show you a photo, but Emma came down with a tummy bug last night and she doesn't look so hot! But she was glad to do the honours. Drum roll please....
The winner of the 3 Fred's Flower Blossom Kits is Debra Dukes ( comment #49). Congratulations! Debra has a wonderful crafty card blog called Creative Heart Designs. Debra, I will send you an email, please get back to me and I'll hook you up :)
Have a great day, everyone.
The winner of the 3 Fred's Flower Blossom Kits is Debra Dukes ( comment #49). Congratulations! Debra has a wonderful crafty card blog called Creative Heart Designs. Debra, I will send you an email, please get back to me and I'll hook you up :)
Have a great day, everyone.
Monday, June 23, 2008
Announcement - 3 Blossom Kits are ready
I have finally finished the Fred's Flower Blossom Kits. I added 5 more papers to make it a total of 8 patterned papers per kit. Colours available are Blue, Pink and Purple. Details at the STORE. I am also making the flower sheets available individually for those who don't want the papers, but if purchasers change their minds and then want the full kit, there will be important info in the download email ;)
The blog candy is still open until Wednesday midnight... who am I kidding... you will have until Thursday morning I am not staying up till midnight ;) (and the kits will have the extra papers) wink wink.
I spent all day getting these ready, Blogger was quite flaky today!!!! So I am done in and going to bed :) If you notice anything odd/wrong with anything, I lost my marbles at about 3pm! Please let me know and I will fix whatever it is as soon as I can.
As you were! Fred says night night.
The blog candy is still open until Wednesday midnight... who am I kidding... you will have until Thursday morning I am not staying up till midnight ;) (and the kits will have the extra papers) wink wink.
I spent all day getting these ready, Blogger was quite flaky today!!!! So I am done in and going to bed :) If you notice anything odd/wrong with anything, I lost my marbles at about 3pm! Please let me know and I will fix whatever it is as soon as I can.
As you were! Fred says night night.
Saturday, June 21, 2008
Blue Blossoms & Allison's Girls & Blog Candy!

Please make sure you scroll down to the end for info on BLOG CANDY!
Hello Peeps! I have been busy making and painting stuff for y'all to play with :) I made this card from a digital patterned paper and flower kit I will be offering very soon! I am packing them up and hopefully will have them up by the end of the weekend. I coloured the flowers and leaves from the Fred's Flowers v3 - Whirly Flowers outline kit. So far I have 3 flavours of blossoms - Blue, HotPink, and, of course, Purple! I will have previews and info soon. I will be devoting time now to making coloured flowers and designs for my colouring challenged friends ;)
I nabbed this cute girl from Allison and her Girls of the World post. Allison has also posted boys and everyday girls as well to download. She also shows you where she found them, how she made them black and white, and how to get the most wonderful clipart for your projects - link here. These girls have been up for awhile, I have finally got around to playing with them, delightful!
I coloured this cutie with colored pencils and OMS and outlined the dark flowers with blue stardust pen, and little flowers with clear stardust pen, centers are lime-green Stickles glue.
NOW THE BLOG CANDY: 3 of Fred's Flowers Blossom Kits ( digital) - Blue, Pink and Purple. Here is a small preview of what you get ( plus all the flowers and leaves as full size single images ).

Please leave a comment on this post ( Make sure your name or blog link is on it or I can't find you -wink). I will leave this open until Wednesday June 25th. I will have Emma draw out of a hat and announce the winner on Thursday. If the winner has bought these flowers already I will offer a digital gift certificate toward my store for equal value of the purchase price. Good luck!
OH YES, and HAPPY 50,000 HITS to me, yahoo! I saw the ticker turn over today ;)
Thursday, June 12, 2008
Absence & Grieving
We tragically lost our beloved Molly last weekend. She will always be in our hearts and I hope there are plenty of jerky treats, balls, and frisbees over the rainbow bridge.

Molly Miller 1999-2008
We are doing better now but it has taken a tole on me. We are busy for the remainder of this week with birthdays and ballet recitals. I had papercrafty things in the works but I had to put them on hold. I hope to be back to "business" next week. Take care everyone.

Molly Miller 1999-2008
We are doing better now but it has taken a tole on me. We are busy for the remainder of this week with birthdays and ballet recitals. I had papercrafty things in the works but I had to put them on hold. I hope to be back to "business" next week. Take care everyone.
Wednesday, June 04, 2008
Fred's Flowers v2 UPDATE
I have updated the Fred's Flowers v2 Pointy Petals Pack to include single images of the flowers and leaves for more versatility eg resizing and colouring on the computer. I have also reduced the price to $5 CAD from $6 and I have notified purchasers with the update and info. If you have purchased this product and haven't received an update email from me via E-Junkie, please email me with your transaction ID number.
Fred's Flowers v.3 - Whirly Flowers and a freebie
Fred's Flowers v.3 - Whirly Flowers - outline sheets is now up at the store.
Here are some samples. There is a third flower type on the sheet but I haven't got the card made yet. Put your sunglasses on for the first card LOL! The green cardstock was a piece I used to show the "inlaws" how the cuttlebug worked.... thinking I would never use it... not "me" or so I thought. LOL It went well with these coloured flowers. The greeting I made in PSP to fit the opening of the "stamp" die that came with my cuttlebug. The die is square and 1.5" wide and I didn't have too many greeting stamps that fit this opening, so I made some. If you would like the sheet ( has general greetings - "Happy Birthday!", "Congrats!", "Just Because", "Just for You!", "With Love", "Happy Hello!" & "Best Wishes") you can download it HERE. It is a PDF file so please right-click on the link and save the file or it might open in your browser. The "girth" around each greeting should be sufficient for round/square/rectangular dies around 2 to 3 ". Please leave a comment if you have downloaded it :) I also take requests! ( but they have to be short and sweet to fit) I'll post the new greetings on this blog.

Here is another card. I lost my pastel sugarcoated brads I just bought boohoo!!!!! So I have been adding Stickles glitter glue to my dollar brads ( this one is grey with platinum stickles). I have also been adding some clear glue ( any clear glue/glaze/crystal effects, etc) to the brad and shaking on some "glamour dust" from DecoArt. I dry my brads in the hollow bottoms of my upside-down markers LOL! My 10 yr old son had that bright idea after he saw his mom holding a wet brad in a panic LOL. I guess you could stick them in styrofoam or flower foam as well.

The other flower has 3 petals and you layer & offset the flowers. There is also a sheet of assorted leaves. I'll make samples with the leaves soon. There are so many more things I want to get ready, maybe if I "burn the midnight oil", I can get a few more up :)
Here are some samples. There is a third flower type on the sheet but I haven't got the card made yet. Put your sunglasses on for the first card LOL! The green cardstock was a piece I used to show the "inlaws" how the cuttlebug worked.... thinking I would never use it... not "me" or so I thought. LOL It went well with these coloured flowers. The greeting I made in PSP to fit the opening of the "stamp" die that came with my cuttlebug. The die is square and 1.5" wide and I didn't have too many greeting stamps that fit this opening, so I made some. If you would like the sheet ( has general greetings - "Happy Birthday!", "Congrats!", "Just Because", "Just for You!", "With Love", "Happy Hello!" & "Best Wishes") you can download it HERE. It is a PDF file so please right-click on the link and save the file or it might open in your browser.

Here is another card. I lost my pastel sugarcoated brads I just bought boohoo!!!!! So I have been adding Stickles glitter glue to my dollar brads ( this one is grey with platinum stickles). I have also been adding some clear glue ( any clear glue/glaze/crystal effects, etc) to the brad and shaking on some "glamour dust" from DecoArt. I dry my brads in the hollow bottoms of my upside-down markers LOL! My 10 yr old son had that bright idea after he saw his mom holding a wet brad in a panic LOL. I guess you could stick them in styrofoam or flower foam as well.

The other flower has 3 petals and you layer & offset the flowers. There is also a sheet of assorted leaves. I'll make samples with the leaves soon. There are so many more things I want to get ready, maybe if I "burn the midnight oil", I can get a few more up :)
Monday, June 02, 2008
Thank you - Donation Total for Canadian Cancer Society
Thank you to all who purchased the Daffodil Cardfront Kit. $1.50 of each purchase went to the Canadian Cancer Society. The total in purchases last month was 61 x $.150 = $91.50!!! Thank you again, so much!
Here are some screenshots of the transactions and donation. Silly me made a mistake and requested receipt by mail, so I don't have the official receipt yet, I hope this will do.


Please click images to enlarge.
The last day of this drive was May 31 st. Two years ago, on May 31st, I lost my grandmother, Flossy to cancer. She was my world and we miss her terribly. We love you Gramma.

Here are some screenshots of the transactions and donation. Silly me made a mistake and requested receipt by mail, so I don't have the official receipt yet, I hope this will do.


Please click images to enlarge.
The last day of this drive was May 31 st. Two years ago, on May 31st, I lost my grandmother, Flossy to cancer. She was my world and we miss her terribly. We love you Gramma.

Fred's Flowers v2 ( aka Faux Foldy Flowers) -Pointy Petals Pack

Available now at the Fred, She Said Store. I will be adding more throughout the week and I hope to have some coloured flowers ready next week. I also hope to get a third set of Fred's Flowers up tomorrow. I am trying on a name change " Fred's Flowers" as I am seriously finding "Faux Foldy Flowers" a bit of a mouthful LOL!
Sample Cards:


Saturday, May 31, 2008
CARD - Faux Foldy Flowers - mach 2!

Here is a faux foldy flower card using a flower from my new " soon to be released" Pointy Petals Pack. Like the name? LOL I am just working on some new foliage and I hope to have it ready for sale tonight or tomorrow :) There will be 7 different flower shapes in varying sizes.
The flower is quite high; I didn't glue the middle down ( which would have made it less puffy) and it is, I am guessing, over 1/2" sticking out.
I used an "orange" General's watercolour pencil to colour and blended with baby oil using tortillons. This time I coloured in a "tear drop" shape on each petal and blended the middle then blended out to the edges of the petal. I did a bit of outlining with my stardust pen.

It is such a bright happy orange... just like an orange creamsicle, if you have ever had one... yum! The brad is a Doodlebug Sugarcoated Brad I bought from the new scrapbooking store we have in our little town... I can walk to it... Happy Dance!!!! OK I will put a "plug" in ... Karen's Creations :) I don't know if she handles international customers; her website looks like it is in the middle of updating.
OK back to work I go.....
Thursday, May 22, 2008
Pencil Blending Tutorial with homemade tortillons and baby oil PT 2
This is a continuation of this tutorial. I will be colouring Faux Foldy Flowers and showing you different techniques and ways of colouring them using the pencil blending technique with baby oil and homemade paper tortillons. I am going to assume now that you have your sharpened pencils, primed tortillon, sandpaper and image sitting in front of you ready to colour ;) I also forgot to tell you to scruff up the end of your new tortillon so that it will blend better ( you can still do this even if there is baby oil on it). If you are going to be colouring with multiple colour families, I'd advise making many tortillons and have 4-5 ready and primed with oil/OMS. Then you won't have to scuff the colour off the ends of the tortillons near as much.
EDIT: A primed tortillon - dip just the tip of your tortillon into the oil and blot several times with tissue or paper towel. The tortillon is ready when the marks you make by scribbling with your tortillon on scrap paper are dry. Yes, the tortillon is dry and pushes the pencil color like magic! No need for all this nonsense with gamsol/OMS/Zest-it type solvents- just apply the OMS and go. A wetter tortillon with OMS will give you great effects and will need less blending muscle.
Another tip, if your tortillon doesn't seem to be blending as well, rough it up on the sandpaper occasionally, do this before you think you might need more baby oil. Also lightly mould the roughed up tip back into shape with your fingers.
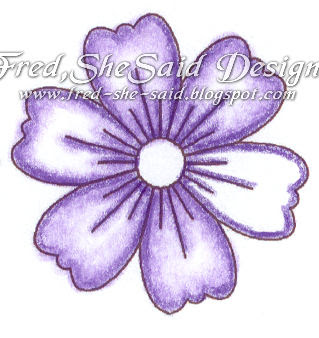
Here is a "no fail" technique and good to start off with. It will never do you wrong LOL! Just above, I have shown a purple flower ( prismacolor used - violet pc932). I have outlined the edges with a medium color line and I have kept the right petal unblended. Once you have outlined your whole flower, take your "clean" primed tortillon and make tiny circles around the line, working your way along the lines, trying to pull the colour into the white area of the petals. You will notice the tortillon feels scratchy when blending - get used to it ;) Then blend the same way on top of the area you have already blended out to soften the colour and bring the colour faintly into the white areas. A tip - if you are running out of colour; go back to the coloured line and grab a bit of colour from it and continue on with your blending. Notice the petal opposite the unblended one is one that shows the initial blending step. Blending might take some working and reworking, don't be afraid to "work it", you will win! :)
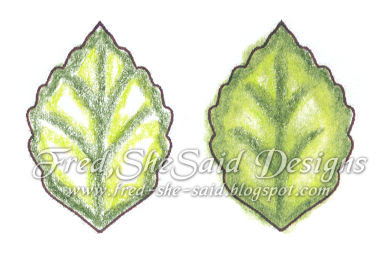
Here is a "no fail" leaf with a bit of an extra twist. Outline the leaf with a dark green ( Olive Green pc911) and then outline that colour with a medium or lighter green ( Chartreuse pc989 ). If the leaf had inked veins, outline those too. Fred's fast and dirty method - blend with a circular motion through the dark and through the light green working your way to the white areas of the leaf. Proper way, blend the light green first then go back blend the dark green out. Notice how crummy my colouring job was - oil/OMS blending is very forgiving LOL!
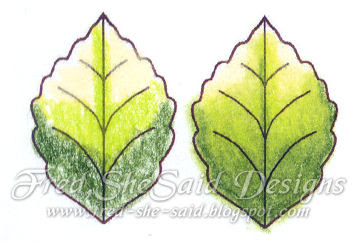
Here is another leaf technique. I used Olive Green, Chartreuse, and Cream (pc914). Cream is one of those colours I would NOT be without, I use it in almost every project. I usually use it in the "white areas" of a flower because it is just "warmer" then stark white... ok now I found the word, it adds "richness" just like real cream LOL. Work your way from light to dark, then you won't contaminate the light areas.
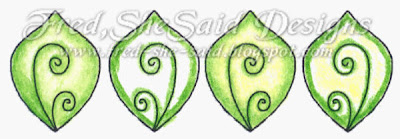
Here is another leaf showing the difference of adding a light yellow to the white areas before blending. It is much more pronounced in RL than in this scan. This helps add POP when your dark green doesn't have much yellow tones in its pigment. I used apple green (pc912) here and it does have a fair bit of yellow tone.

This flower is on the small side in RL. Notice how I shaded it on the unblended petal. Also after blending was done, I took a pale pink and "scrumbled" a bit of colour in the lighter purple areas ( you can also blend this out but not necessary). Scrumbling ( well for me in this example) is making tiny circles with very light pressure - see the pink "blob" to the right of the flower. Colours used - Violet pc932, Lilac pc956 and Pink pc929.
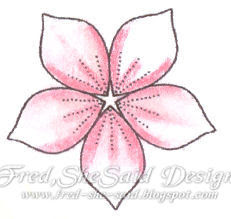
Here is another technique. Work your tortillon into the pink colour at the base of the petal and then work the tortillon back and forth in a straight line out to the top of the petal, you will get a blended streak/crease. Then continue on "circle blending" from the base and outlines to shade the flower. I am pretty sure I used Pink in this one ;)

Please click to enlarge - a must see up close :)
I don't know what to call this technique, Variegated perhaps? Colour like above ( I used Cream and Mulberry pc995). Blend the cream first to smooth it out. Work your tortillon into the base colour to get as much colour on to the tortillon as you can then do that straight back and forth blending like the pink flower in a straight line, keep adding "streaks" like in the middle flower; you can blend out the top of the streaks to soften. Go back and do circle blending at the base and work up a bit. Isn't that cool!? The smaller flower to the right is done similarly, but you are working down the petal.
Here are some more examples and "teasers"! Have a great day and I hope you enjoyed this tutorial :)
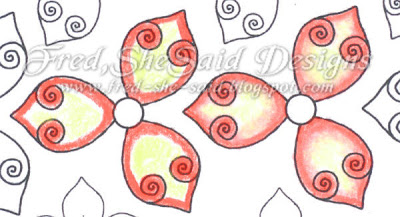
Colours - Carmine Red pc926 & Deco Yellow ( retired )

Colours - True Blue pc903, True Green pc910 & Canary Yellow pc916

Colours - Dark Brown pc946 & Yellow Ochre pc942
EDIT: A primed tortillon - dip just the tip of your tortillon into the oil and blot several times with tissue or paper towel. The tortillon is ready when the marks you make by scribbling with your tortillon on scrap paper are dry. Yes, the tortillon is dry and pushes the pencil color like magic! No need for all this nonsense with gamsol/OMS/Zest-it type solvents- just apply the OMS and go. A wetter tortillon with OMS will give you great effects and will need less blending muscle.
Another tip, if your tortillon doesn't seem to be blending as well, rough it up on the sandpaper occasionally, do this before you think you might need more baby oil. Also lightly mould the roughed up tip back into shape with your fingers.

Here is a "no fail" technique and good to start off with. It will never do you wrong LOL! Just above, I have shown a purple flower ( prismacolor used - violet pc932). I have outlined the edges with a medium color line and I have kept the right petal unblended. Once you have outlined your whole flower, take your "clean" primed tortillon and make tiny circles around the line, working your way along the lines, trying to pull the colour into the white area of the petals. You will notice the tortillon feels scratchy when blending - get used to it ;) Then blend the same way on top of the area you have already blended out to soften the colour and bring the colour faintly into the white areas. A tip - if you are running out of colour; go back to the coloured line and grab a bit of colour from it and continue on with your blending. Notice the petal opposite the unblended one is one that shows the initial blending step. Blending might take some working and reworking, don't be afraid to "work it", you will win! :)

Here is a "no fail" leaf with a bit of an extra twist. Outline the leaf with a dark green ( Olive Green pc911) and then outline that colour with a medium or lighter green ( Chartreuse pc989 ). If the leaf had inked veins, outline those too. Fred's fast and dirty method - blend with a circular motion through the dark and through the light green working your way to the white areas of the leaf. Proper way, blend the light green first then go back blend the dark green out. Notice how crummy my colouring job was - oil/OMS blending is very forgiving LOL!

Here is another leaf technique. I used Olive Green, Chartreuse, and Cream (pc914). Cream is one of those colours I would NOT be without, I use it in almost every project. I usually use it in the "white areas" of a flower because it is just "warmer" then stark white... ok now I found the word, it adds "richness" just like real cream LOL. Work your way from light to dark, then you won't contaminate the light areas.

Here is another leaf showing the difference of adding a light yellow to the white areas before blending. It is much more pronounced in RL than in this scan. This helps add POP when your dark green doesn't have much yellow tones in its pigment. I used apple green (pc912) here and it does have a fair bit of yellow tone.

This flower is on the small side in RL. Notice how I shaded it on the unblended petal. Also after blending was done, I took a pale pink and "scrumbled" a bit of colour in the lighter purple areas ( you can also blend this out but not necessary). Scrumbling ( well for me in this example) is making tiny circles with very light pressure - see the pink "blob" to the right of the flower. Colours used - Violet pc932, Lilac pc956 and Pink pc929.

Here is another technique. Work your tortillon into the pink colour at the base of the petal and then work the tortillon back and forth in a straight line out to the top of the petal, you will get a blended streak/crease. Then continue on "circle blending" from the base and outlines to shade the flower. I am pretty sure I used Pink in this one ;)

Please click to enlarge - a must see up close :)
I don't know what to call this technique, Variegated perhaps? Colour like above ( I used Cream and Mulberry pc995). Blend the cream first to smooth it out. Work your tortillon into the base colour to get as much colour on to the tortillon as you can then do that straight back and forth blending like the pink flower in a straight line, keep adding "streaks" like in the middle flower; you can blend out the top of the streaks to soften. Go back and do circle blending at the base and work up a bit. Isn't that cool!? The smaller flower to the right is done similarly, but you are working down the petal.
Here are some more examples and "teasers"! Have a great day and I hope you enjoyed this tutorial :)

Colours - Carmine Red pc926 & Deco Yellow ( retired )

Colours - True Blue pc903, True Green pc910 & Canary Yellow pc916

Colours - Dark Brown pc946 & Yellow Ochre pc942
Pencil Blending Tutorial with homemade tortillons and baby oil PT 1
I thought I would show you some methods of pencil blending that I use, I have modified this technique so that it uses materials you should have around your house AND less toxic to your lungs LOL! Before I begin, I must admit, I have just spent this week trying out the baby oil ( instead of OMS) to see what the pros and cons were. A big thank you to AmzdByHsGrace and Darsie from the CoC board. Darsie wrote a tutorial on how she used baby oil and Derwent Inktense pencils ( on Fred's wishlist!) on watercolour paper. Well I have bucked the idea of using baby oil on cards as it can leech out of your paper and onto anything near it. BUT, if used sparingly, I think it should be okay for your projects ( please chime in if you agree or disagree :) ). Furthermore, there are a ton of awesome tutorials out there in web land to try. I posted a few links a few blog entries back. Here is another one from Sue Nelson to add to the list - I love her cards! ... and I can't use "love" too strongly here LOL
I will show you what "I do" with the flowers. This Part 1 will deal with your materials and getting you ready.
Pros of Baby Oil/Mineral Oil:
- it is cheap and readily available
- no toxic fumes! ... and smells baby fresh!
- a little goes a LONG way - I applied the oil once to my blending tortillon and I blended a whole sheet of flowers with it and it was still ticking! The oil doesn't evaporate, but it will dry eventually . OMS evaporates fairly quickly and you are usually reapplying it to your stump during a project.
- I got pretty smooth blending results - I think as good as OMS - WITH a paper tortillon. I did not try my regular blending stumps as I only have a few and didn't want to mess them up. I achieved SMOOTHER results with the paper tortillon and oil on copy paper than I did with my OMS and stump. I also got better results with the tortillon and OMS, go figure.
-they work on just about any pencil, waxy colored pencils, watercolour/watersoluble pencils, chalk/pastel pencils... I have tried them all and they work.
-baby oil did not bleed/smear the ink outlines from my printer.
CONS of Baby Oil:
- oil spots on your paper! If you use too much OMS it can make spots on your paper, but it will evaporate and disappear. Not so with oil. This is what I did. I dipped just the tip of the tortillon into the oil then blotted the tip with tissue, I used the tortillon on a scrap piece of paper and checked to see if oil leeched to the back of the paper or made a spot on the front. If not, I was good to go. If still too much oil, reblot with tissue/papertowel or draw with the tortillon on scrap until the marks are "dry".
EDIT: Carolivy gave me a good tip. If you have it, essential oils are good as a blending fluid. She uses Rosewood essential oil for dorsing in parchment craft and says it works great and doesn't leave oily spots. She also thinks Lavender oil would work as well. Oh can you imagine the wonderful smell while you craft.... :)
ON WITH TUTORIAL:
So you need materials:
-baby oil or mineral oil, ..... OMS/Gamsol/Zest-It, etc if you have it.
-tortillons ( stumps if you have them) I will show how to make them yourself!
-tissue or paper towel for blotting
-Sandpaper paddle, sanding block, piece of sand paper, or emery board - to sand off colour on tip of tortillon so you can use it for another colour.
-pencils - wax based Prismacolor is what I am using, watercolor/pastel pencils will work too. I prefer wax based, the colours are brighter, although I think those Inktense pencils would rock!
-a pencil sharpener! I almost forgot that one! LOL
-white CS/watercolor/regular paper, something matte not glossy
-image to colour - be it stamped or printed or hand drawn with a black pigment pen.
HOW TO MAKE A PAPER TORTILLON:
Find some regular weight paper, the more fuzzy/fibrous the better, eg recycled paper, copy paper, try different kinds, see what works best for you ;) ; you will also need some tape and a "pushing tool" (darning needle, skewer, chopstick, thick wire, etc.)
Cut a full sheet into thirds, no real science or measurement, roughly 3.5" by 6-8". The new cut sheets are then cut straight on a diagonal lengthwize starting about 1" from one side to 1" on the other. I used this tutorial ( great diagrams ) to make mine but did a few adjustments, I rolled the paper on the needle of a paperpricking tool or bamboo skewer ( something skinny and you can hold onto easily while rolling). Roll your paper pretty tight. When rolling, roll the flat side so that it is even and when done rolling use your push tool to push the roll out through the flat side until it comes to a sharp point. I used a bamboo skewer or a chopstick to push the paper roll out. Hold onto the tortillon and roll tape around it to secure. Here are some of mine.

I will post PT 2 soon. Here are some flowers I made. I haven't had time to turn them into cards yet. Yes, I am a tease! TaTa for now!

I will show you what "I do" with the flowers. This Part 1 will deal with your materials and getting you ready.
Pros of Baby Oil/Mineral Oil:
- it is cheap and readily available
- no toxic fumes! ... and smells baby fresh!
- a little goes a LONG way - I applied the oil once to my blending tortillon and I blended a whole sheet of flowers with it and it was still ticking! The oil doesn't evaporate, but it will dry eventually . OMS evaporates fairly quickly and you are usually reapplying it to your stump during a project.
- I got pretty smooth blending results - I think as good as OMS - WITH a paper tortillon. I did not try my regular blending stumps as I only have a few and didn't want to mess them up. I achieved SMOOTHER results with the paper tortillon and oil on copy paper than I did with my OMS and stump. I also got better results with the tortillon and OMS, go figure.
-they work on just about any pencil, waxy colored pencils, watercolour/watersoluble pencils, chalk/pastel pencils... I have tried them all and they work.
-baby oil did not bleed/smear the ink outlines from my printer.
CONS of Baby Oil:
- oil spots on your paper! If you use too much OMS it can make spots on your paper, but it will evaporate and disappear. Not so with oil. This is what I did. I dipped just the tip of the tortillon into the oil then blotted the tip with tissue, I used the tortillon on a scrap piece of paper and checked to see if oil leeched to the back of the paper or made a spot on the front. If not, I was good to go. If still too much oil, reblot with tissue/papertowel or draw with the tortillon on scrap until the marks are "dry".
EDIT: Carolivy gave me a good tip. If you have it, essential oils are good as a blending fluid. She uses Rosewood essential oil for dorsing in parchment craft and says it works great and doesn't leave oily spots. She also thinks Lavender oil would work as well. Oh can you imagine the wonderful smell while you craft.... :)
ON WITH TUTORIAL:
So you need materials:
-baby oil or mineral oil, ..... OMS/Gamsol/Zest-It, etc if you have it.
-tortillons ( stumps if you have them) I will show how to make them yourself!
-tissue or paper towel for blotting
-Sandpaper paddle, sanding block, piece of sand paper, or emery board - to sand off colour on tip of tortillon so you can use it for another colour.
-pencils - wax based Prismacolor is what I am using, watercolor/pastel pencils will work too. I prefer wax based, the colours are brighter, although I think those Inktense pencils would rock!
-a pencil sharpener! I almost forgot that one! LOL
-white CS/watercolor/regular paper, something matte not glossy
-image to colour - be it stamped or printed or hand drawn with a black pigment pen.
HOW TO MAKE A PAPER TORTILLON:
Find some regular weight paper, the more fuzzy/fibrous the better, eg recycled paper, copy paper, try different kinds, see what works best for you ;) ; you will also need some tape and a "pushing tool" (darning needle, skewer, chopstick, thick wire, etc.)
Cut a full sheet into thirds, no real science or measurement, roughly 3.5" by 6-8". The new cut sheets are then cut straight on a diagonal lengthwize starting about 1" from one side to 1" on the other. I used this tutorial ( great diagrams ) to make mine but did a few adjustments, I rolled the paper on the needle of a paperpricking tool or bamboo skewer ( something skinny and you can hold onto easily while rolling). Roll your paper pretty tight. When rolling, roll the flat side so that it is even and when done rolling use your push tool to push the roll out through the flat side until it comes to a sharp point. I used a bamboo skewer or a chopstick to push the paper roll out. Hold onto the tortillon and roll tape around it to secure. Here are some of mine.

I will post PT 2 soon. Here are some flowers I made. I haven't had time to turn them into cards yet. Yes, I am a tease! TaTa for now!

Wednesday, May 21, 2008
Another Faux Foldy Flower Card - Polka Dots

A birthday card for my niece I made last weekend. The flower was printed on copy paper, colored with a lovely Peacock Blue Prisma pencil and blended with OMS. I drew polka dots with a white glaze pen... I love this pen, it goes on "clear" and as it dries, it goes completely opaque and shiny! I used a paisley cuttlebug folder & dollar store ribbon and brad. If you'll notice, I folded the petals the other way this time.
I hope to have tutorials for colouring methods later this week or next; I have coloured a few flowers with a variegated technique that I will show soon. I am really "stuck" on these flowers LOL! They are quite addictive. I have 2 or 3 more flower shapes in the works. TODAY, I hope to get them completed. LOL.
Subscribe to:
Posts (Atom)